The HTML ul and li tags have been using for ages. The ul and li should be one the most commonly used tags in webpage design. However some webmasters are sometimes quite confuse with the usage. Let’s review the basic techniques of using the HTML ul and li tags.
Whenever we want to display some items in a listing style, we will do it that way, as shown below:
<html>
<head>
<title>Using HTML UL and LI Tags</title>
</head>
<body><h2>Please visit my websites</h2>
<ul>
<li><a href=”#”>Site 1</a></li>
<li><a href=”#”>Site 2</a></li>
<li><a href=”#”>Site 3</a></li>
</ul>
</body>
</html>
This is the most basic HTML structure of ul and li tags to produce a listing. The listing will display as below:

When I started composing HTML webpages with a notepad in about 1975, I was very satisfied with this result. Actually this was the default display of a listing. We could not doing anything to change the display.
The HTML world has been changing since then. We can now change the display of the HTML listing by applying some styles to the ul and li tags.
Let’s attach a stylesheet to the above HTML document to play around:
<html>
<head>
<title>Using HTML UL and LI Tags</title>
<link rel=”stylesheet” type=”text/css” href=”style.css” >
</head>
<body><h2>Please visit my websites</h2>
<ul>
<li><a href=”#”>Site 1</a></li>
<li><a href=”#”>Site 2</a></li>
<li><a href=”#”>Site 3</a></li>
</ul>
</body>
</html>
Open the stylesheet (style.css) with a text editor. Add the following styles to style.css file.
The default bullet of listing is very boring. We have used it for many years. Let’s remove the bullet:
ul {
list-style-type: none; /* Remove default list bullets*//* Set padding and margins to zero for better style control*/
padding: 0;
margin: 0;/* Set padding and padding as required */
/*margin-left: 20px;*/
}
The HTML listing will now looks like:

Once the default listing of HTML ul tag was removed, we can now play around with the li tag.
We want to use a custom bullet. This can be done easily by using the background-image property:
li {
background-image: url(list-arrow.gif);background-repeat: no-repeat;
background-position: 0px; /* background position of image*/
padding-left: 10px; /* left padding of listing */
}
The output will now look like:

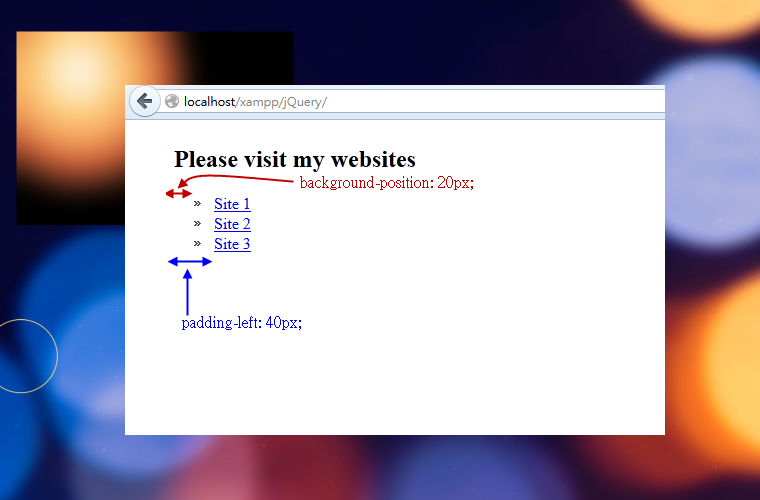
The position of the background image and listing can easily be changed, as shown below:
li {
background-image: url(list-arrow.gif);background-repeat: no-repeat;
background-position: 20px; /* background position of image*/
padding-left: 40px; /* left padding of listing */
}
The HTML listing will become:

Source Codes of HTML UL and LI Example:
The Source of HTML document and stylesheet are:
File listing.html
<html>
<head>
<title>Using HTML UL and LI Tags</title>
<link rel=”stylesheet” type=”text/css” href=”style.css” >
</head>
<body><h2>Please visit my websites</h2>
<ul>
<li><a href=”#”>Site 1</a></li>
<li><a href=”#”>Site 2</a></li>
<li><a href=”#”>Site 3</a></li>
</ul>
</body>
</html>
File style.css
ul {
list-style-type: none; /* Remove default list bullets*//* Set padding and margins to zero for better style control*/
padding: 0;
margin: 0;/* Set padding and padding as required */
/*margin-left: 20px;*/
}li {
background-image: url(list-arrow.gif);background-repeat: no-repeat;
background-position: 20px; /* background position of image*/
padding-left: 40px; /* left padding of listing */
}
This post discuss how to use HTML ul and li tags.
Leave a Reply