The first step of this jQuery Lava Lamp Tutorial is to make a CSS Horizontal Navigation Menu. In this jQuery tutorial, we use DreamWeaver Webpage Editor to compose the Horizontal Menu. Actually any webpage editors or even a notepad can do the same job.
jQuery Tutorial Goal
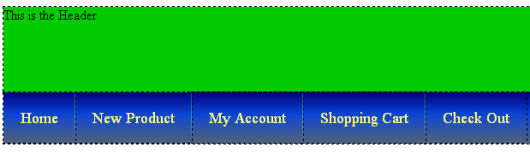
Table of Contents
jQuery Lava Lamp Horizontal Navigation Menu (Part 1) – Prepare Menu
The above CSS Horizontal Navigation Menu will be created upon finish this tutorial. The CSS Horizontal Navigation Menu composed of five menu items:
- Home
- New Product
- My Account
- Shopping Cart
- Check Out
The procedures of preparing a CSS Horizontal Navigation Menu were explained step by step in very details in the video tutorial below:
CSS Horizontal Navigation Menu sample website:
HTML Layout of Header Section and CSS Horizontal Menu
To create a more interesting Navigation Menu, a Header is also added. Actually, this is a very common layout of a webpage.
This is the HTML codes of the CSS Horizontal Navigation Menu. The Horizontal Menu is enclosed within a Div Layer (mainNavMenu).
<div id="Header">This is the Header</div>
<div id="mainNavMenu">
<ul>
<li><a href="index.html">Home</a></li>
<li><a href="product.html">New Product</a></li>
<li><a href="account.html">My Account</a></li>
<li><a href="cart.html">Shopping Cart</a></li>
<li><a href="checkout.html" style="background-image:none;">Check Out</a></li>
</ul>
</div>
Download Tutorial Source Codes
The complete source codes of this tutorial is available to download for free.
![]() css-horizontal-menu.html
css-horizontal-menu.html![]() menu_bg.jpg
menu_bg.jpg![]() menu_partition.jpg
menu_partition.jpg![]() stylesheet.css
stylesheet.css
Click here to download the source file.
The above source files were lost by accident when moving the website.
*****
jQuery Lava Lamp Horizontal Navigation Menu (Part 2) – Modify Styles of Menu
The CSS Horizontal Navigation Menu was prepared. Once the CSS Horizontal Navigation Menu was made, this is rather easy to customize to other styles. In this jQuery tutorial series, the CSS Horizontal Menu will be customized into a Lava Lamp Horizontal Navigation Menu.
In Part 2 of this jQuery Lava Lamp Horizontal Navigation Menu tutorial, the styles of the menu will be customized as shown in the diagram.
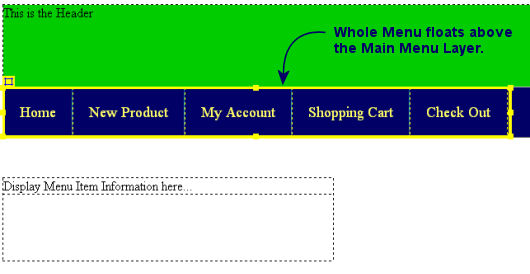
This is what the styles of the Horizontal Navigation customized:
- Set the Main Menu Layer a relative position. This way, the menu items and lava lamp box can float above it.
- Set the position of the whole Menu to absolute so that it floats above the Main Menu Layer.
To show how the codes works, a TextArea field was added below the Menu.
The procedures were explained step by step in very details in the video tutorial below.
HTML Layout of Header Section and CSS Horizontal Menu
This is the HTML codes of the CSS Horizontal Navigation Menu after finished Part 2 of this tutorial:
<div id="Header">This is the Header</div>
<div id="mainNavMenu">
<ul>
<li><a href="index.html">Home</a></li>
<li><a href="product.html">New Product</a></li>
<li><a href="account.html">My Account</a></li>
<li><a href="cart.html">Shopping Cart</a></li>
<li><a href="checkout.html" style="background-image:none;">Check Out</a></li>
</ul>
</div>

<div style="margin-top: 50px; width: 400px; height: 100px">
<div id="output">Display Menu Item Information here...</div>
</div>
*****
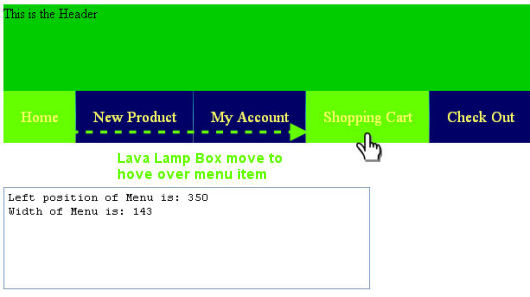
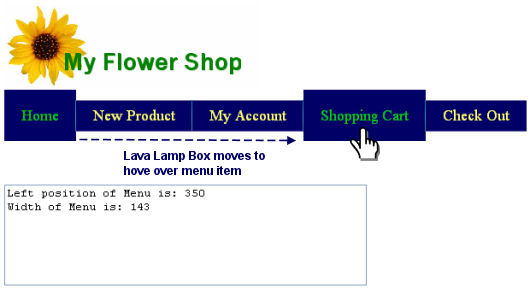
jQuery Lava Lamp Horizontal Navigation Menu (Part 3) – Add Lava Lamp to Menu
In Part 3 of this jQuery Lava Lamp Horizontal Navigation Menu tutorial, a Lavalamp Box was added to the Menu. Some jQuery codes were also written and tried to move the Lavalamp box along the hoved over menu item.
jQuery Tutorial Goal
1. A Lava Lamp box was added to the Horizontal Navigation Menu.

2. The Lava Lamp box moved to the Menu Item when mouse pointer hove over.
The jQuery coding and procedures were explained step by step in very details in the video tutorial below.
HTML Layout of Header Section and CSS Horizontal Menu
This is the HTML codes of the CSS Horizontal Navigation Menu after finished Part 3 of this tutorial:
<div id="Header">This is the Header</div>
<div id="mainNavMenu">
<ul>
<li><a href="index.html">Home</a></li>
<li><a href="product.html">New Product</a></li>
<li><a href="account.html">My Account</a></li>
<li><a href="cart.html">Shopping Cart</a></li>
<li><a href="checkout.html" style="background-image:none;">Check Out</a></li>
</ul>

<div id="movingBox"></div>
</div>

<div style="margin-top: 50px; width: 400px; height: 100px">
<div id="output">Display Menu Item Information here...</div>
</div>
*****
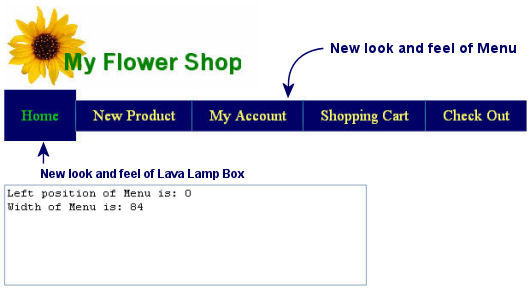
jQuery Lava Lamp Horizontal Navigation Menu (Part 4) – Customize look and feel of Menu
In Part 4 of this jQuery Lava Lamp Horizontal Navigation Menu tutorial, the styles of the Menu and Lavalamp box were customized further.
jQuery Tutorial Goal
1. The styles of Menu and Lava Lamp box were customized further as shown in the diagram below:
2. Same as previous tutorial, the Lava Lamp box moved to the Menu Item when mouse pointer hove over.
The jQuery coding and procedures were explained step by step in very details in the video tutorial below.
HTML Layout of Header Section and CSS Horizontal Menu
The HTML codes of the CSS Horizontal Navigation Menu is same as Part 3 of this tutorial:
<div id="Header">This is the Header</div>
<div id="mainNavMenu">
<ul>
<li><a href="index.html">Home</a></li>
<li><a href="product.html">New Product</a></li>
<li><a href="account.html">My Account</a></li>
<li><a href="cart.html">Shopping Cart</a></li>
<li><a href="checkout.html" style="background-image:none;">Check Out</a></li>
</ul>

<div id="movingBox"></div>
</div>

<div style="margin-top: 50px; width: 400px; height: 100px">
<div id="output">Display Menu Item Information here...</div>
</div>
*****
jQuery Lava Lamp Horizontal Navigation Menu (Part 5) – Use round corners lavalamp box
In Part 5 of this jQuery Lava Lamp Horizontal Navigation Menu tutorial, a round corners Lavalamp box will be used. A round corners Lava Lamp looks more interesting than a rectangular box.
jQuery Tutorial Goal
1. The rectangular Lava Lamp Box was customized into a round corners Lava Lamp box box as shown in the diagram below:
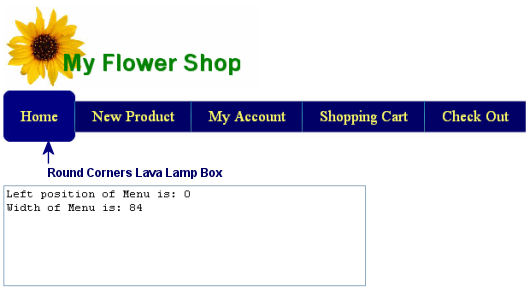
2. The round corners at the right side of Lava Lamp box is actually a div layer floating to the right side of Lava Lamp Layer.

The jQuery coding and procedures were explained step by step in very details in the video tutorial below.
HTML Layout of Header Section and CSS Horizontal Menu
The HTML codes of the CSS Horizontal Navigation Menu after finished Part 5 of this tutorial are shown as below. Note that the div layer “movingBoxRightSide” is floating to the right side.
<div id="mainNavMenu">
<ul>
<li><a href="index.html">Home</a></li>
<li><a href="product.html">New Product</a></li>
<li><a href="account.html">My Account</a></li>
<li><a href="cart.html">Shopping Cart</a></li>
<li><a href="checkout.html" style="background-image:none;">Check Out</a></li>
</ul>

<div id="movingBox"><div id="movingBoxRightSide"></div></div>
</div>

<div style="margin-top: 50px; width: 400px; height: 100px">
<div id="output">Display Menu Item Information here...</div>
</div>
*****
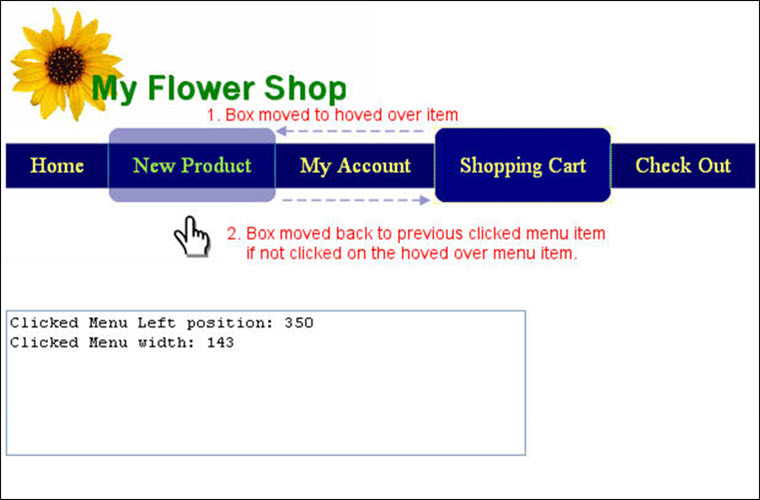
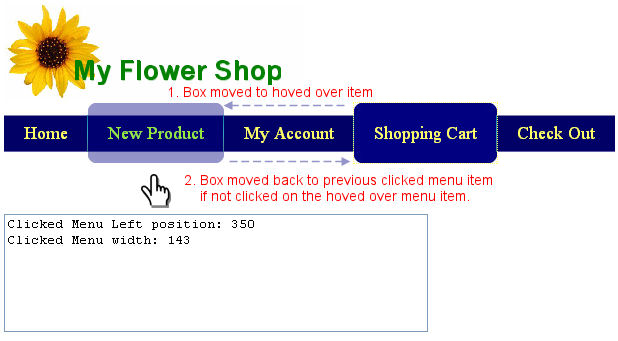
jQuery Lava Lamp Horizontal Navigation Menu (Part 6) – Remember clicked menu position and width
This is the final step and the most important step of this jQuery Lava Lamp Horizontal Navigation Menu tutorial. The position and width of the clicked menu item need to be remembered so that the Lava Lamp box can be returned back.
jQuery Tutorial Goal
1. The position and width of the Lava Lamp Box was remembered when a menu item was clicked. The scenerio is shown in the diagram below:
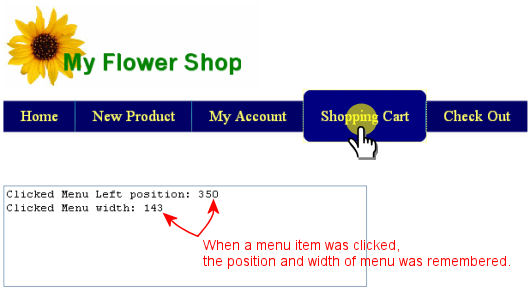
2. Since the position and width of the previous clicked menu item was remembered, the Lava Lamp box can return to the previous clicked menu item.
The jQuery coding and procedures were explained step by step in very details in the video tutorial below.
HTML Layout of Header Section and CSS Horizontal Menu
The HTML codes of the CSS Horizontal Navigation Menu is same as Part 5 of this tutorial series:
<div id="mainNavMenu">
<ul>
<li><a href="index.html">Home</a></li>
<li><a href="product.html">New Product</a></li>
<li><a href="account.html">My Account</a></li>
<li><a href="cart.html">Shopping Cart</a></li>
<li><a href="checkout.html" style="background-image:none;">Check Out</a></li>
</ul>

<div id="movingBox"><div id="movingBoxRightSide"></div></div>
</div>

<div style="margin-top: 50px; width: 400px; height: 100px">
<div id="output">Display Menu Item Information here...</div>
</div>
This is the end of jQuery Lava Lamp Navigation Menu Tutorial.
Leave a Reply