The jQuery setInterval() discussed before allows to call a function to execute in a set time delay in milli-seconds. In other words, the jQuery setInterval() function allows us to create loop animation much easier.
Today, I am going to talk about a jQuery timer plugin that can also create loop animation easily. I found this pugin some years ago. I forgot the download link of this jQuery plugin. The plugin version I am still using is jquery.timers-1.1.2. Okay! Let’s see how to create loop animation with jQuery timer plugin.
This is the loop animation effect:
The jQuery codes are very simple:
<head>
<meta http-equiv="Content-Type" content="text/html; charset=utf-8" />
<title>jQuery Loop Animation Bouncing Ball</title>
<link href="stylesheet.css" rel="stylesheet" type="text/css" />
<script type="text/javascript" src="jquery.js" ></script>
<script type="text/javascript" src="jquery.timers.js" ></script>

<script type="text/javascript">
      $(document).ready(function(){

        // Bounce the basketball in every one second
        $("#basketball").everyTime(1000, function(){

                 $("#basketball")
                // animate the basketball to the top in 0.6 seconds
                .animate({top:"0px"}, 600)
                // drop the basketball to the bottom in 0.4 seconds
                .animate({top:"184px"}, 400);

          });

       });
</script>

</head>
<body>

<h1>jQuery Bouncing Ball Animation</h1>

<div id="frame">
      <div id="basketball"></div>
</div>

</body>
</html>
It simply use the everyTime() function of the jQuery timer plugin to execute the animation in a set time delay in milli-seconds.
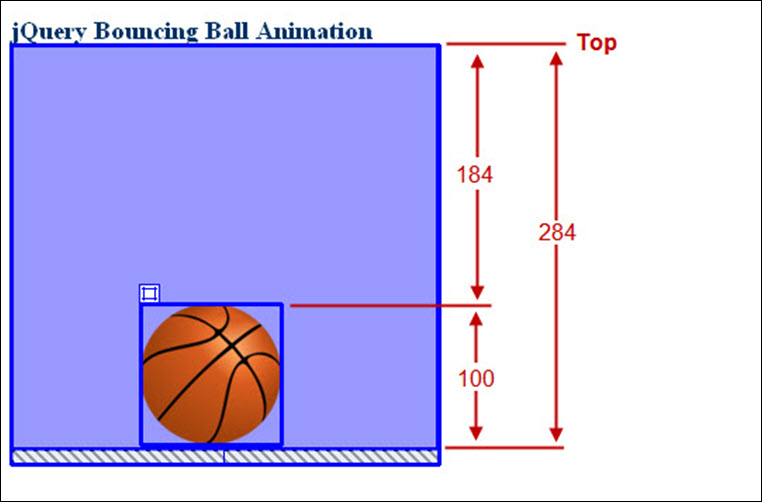
The animating position of the basketball can easily be controlled by checking the styles of the Div layers.

1. The basketball bounced to the top (zero distance from the top):
$(“#basketball”).animate({top:”0px”}, 600);
2. The basketball then dropped back to the bottom (184 pixels from the top):
$(“#basketball”).animate({top:”184px”}, 600);
This jQuery post discussed about loop animation with timer plugin.
Leave a Reply